Carbon fiber wraps are a great way to give your car a modern, high-end look without spending a fortune. They’re more than just eye-catching—they help protect your car’s original paint from scratches and minor damage. If you’re considering this upgrade, you probably want to know how long it will last. The lifespan of a carbon fiber wrap depends on the quality of the wrap, how it’s installed, and how you take care of it. At D&A Customs, we’ve worked with countless customers to make sure their wraps not only look great but also stand the test of time.
A carbon fiber wrap is a vinyl material designed to replicate the look of real carbon fiber. It’s a cost-effective way to give your car a high-end appearance without investing in actual carbon fiber, which can cost thousands of dollars. These wraps are used for full-vehicle applications or smaller details like hoods, roofs, and mirrors, depending on the look you’re going for.
When installed and maintained correctly, a carbon fiber wrap provides both style and practicality, making it a popular choice for car enthusiasts.
A carbon fiber wrap can last 5 to 7 years, sometimes even longer, if you take care of it. The key to getting the most out of your wrap is all about the quality of the vinyl, how it’s applied, and how you treat your car afterward. A cheap wrap or a bad installation job can leave you with peeling edges or faded spots within a year or two.
If you want cool vehicle wraps that turn heads and stand the test of time, the right materials and experts like D&A Customs make all the difference.
Taking care of your carbon fiber wrap is easier than you might think, and it’s worth the effort. A little attention to maintenance can make the difference between a wrap that fades in a few years and one that looks fresh for the long haul. On average, a well-maintained wrap lasts 5 to 7 years, but with the right care, you can stretch that even further.
If you want your vehicle wrap to keep turning heads, small habits like these can go a long way. Plus, caring for your wrap isn’t just about looks—it’s also about protecting your investment and keeping your car in top shape.
Even with proper care, a carbon fiber wrap won’t last forever. Over time, you might notice the deep, textured finish starting to fade or lose its shine, especially if your car spends a lot of time in the sun. Peeling edges and bubbling are other common signs that your wrap has run its course, and they’re hard to ignore once they start showing up. Cracks or scratches can also appear as the wrap ages, particularly if it’s been through tough weather or hasn’t had enough protection.
When these signs start to pop up, it’s a good idea to consider replacing the wrap. Your car will look sharp again, and a fresh wrap will protect the paint underneath. If you’re ready to give your vehicle a new look, D&A Customs has you covered with expert installation and top-quality materials.
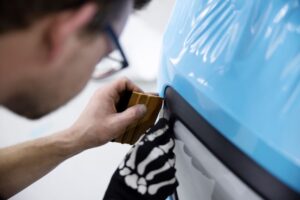
Getting a carbon fiber wrap is about more than just making your car look good—it’s about getting it done right so it lasts. At D&A Customs, we focus on quality and precision with every project. We don’t just throw on a wrap and call it a day. Instead, we take the time to make sure every edge is smooth, every curve is covered, and the wrap looks flawless.
We use only top-tier vinyl that resists fading, peeling, and cracking, even under tough conditions. Our team has experience working with all kinds of vehicles, so we know how to handle tricky areas like mirrors and bumpers. Whether you want a glossy finish that stands out or a matte look that feels sleek and modern, we help you pick the right style for your car.
Choosing D&A Customs means trusting a team that pays attention to the details. Your car will look sharp and stay protected, giving you a wrap you’ll like for years.
Thinking about changing up your car’s look? You’re probably wondering whether a fresh paint job or a vinyl wrap is the better option. Maybe you want something bold and eye-catching, or you just need to cover up some wear and tear. Each choice has its own perks and challenges, from how much it costs to how long it lasts. Let’s break down what makes wraps and paint jobs different, so you can pick what’s best for your car and your budget.
Wrapping your car means covering it with a thin vinyl film that sticks to the surface. This film can be pretty much any color or design you can think of—matte black, glossy red, or even a funky pattern. On the other hand, painting involves spraying layers of paint right onto the car and sealing it with a clear coat for that smooth, shiny finish.
Wraps are great if you want a new look without committing forever since you can peel them off when you’re ready for a change. Paint jobs, though, are more permanent and can give your car that factory-fresh vibe. Still, with D&A Customs, you can explore premium wrap options designed to fit your style and protect your car without breaking the bank.
Let’s talk about differences more.
When deciding between wrapping and painting your car, it’s essential to consider factors like cost, durability, and maintenance. Here’s a comparison to help you make an informed choice:
| Factor | Car wrap | Car paint |
| Cost | – Initial investment. Wrapping a car typically costs between $1,500 and $5,000, depending on vehicle size and design complexity.
– Customization. Complex designs may increase the price. |
– Initial investment. A professional paint job can range from $1,000 to over $7,000, influenced by paint quality and labor.
– Customization. Custom paint jobs with intricate designs can significantly increase costs. |
| Durability | – Lifespan. High-quality wraps last about 5 to 7 years with proper care.
– Protection. Wraps shield the original paint from UV rays and minor abrasions. |
– Lifespan. Quality paint jobs can last up to 10 years or more with regular maintenance.
– Vulnerability. Paint is more susceptible to chips, scratches, and fading over time. |
| Maintenance | – Care requirements. Wraps require gentle hand washing and avoidance of harsh chemicals to maintain appearance.
– Repairs. Damaged sections can be replaced without redoing the entire wrap. |
– Care requirements. Painted surfaces need regular washing, waxing, and occasional polishing to preserve their look.
– Repairs. Touch-ups for chips and scratches can be more involved and costly. |
| Customization | – Flexibility. Offers a wide range of colors, finishes, and designs, including matte, gloss, and textured options.
– Reversibility. Wraps can be removed to revert to the original paint. |
– Flexibility. While offering numerous color options, achieving certain finishes (like matte or metallic) can be more challenging and expensive.
– Permanence. Paint changes are long-lasting and not easily reversible. |
| Application Time | – Installation. Typically completed within 1 to 3 days, depending on complexity.
– Downtime. Shorter vehicle downtime compared to painting. |
– Application. Can take several days to weeks, considering multiple coats and drying times.
– Downtime. Longer periods without vehicle access. |
| Resale Value Impact | – Preservation. Protects original paint, potentially enhancing resale value if the wrap is well-maintained.
– Buyer preference. Some buyers may prefer the original paint over a wrap. |
– Perception. A high-quality paint job can improve resale value, especially if it matches the original color and is in good condition.
– Wear and tear. Visible paint damage can negatively affect resale value. |
Your choice between wrapping and painting should align with your budget, desired aesthetic, and how you plan to maintain your vehicle over time.
Choosing between a wrap and a paint job comes down to what you need from your car’s makeover. Let’s break it down, especially if you’re leaning toward the benefits of wraps.

So, if you’re after a cool new look, some added protection, and the option to switch things up later, wraps are hard to beat. But if you’re all about that timeless, factory-perfect shine, the paint might still win you over. Either way, D&A Customs has you covered with expert advice and top-tier wrap services to make your car look its best.
It’s easy to think that once you tint your windows, you’re set for life. After all, tinted windows look great, keep the heat out, and make driving more comfortable. But here’s the thing—window tints don’t last forever. Over time, the sun, weather, and daily wear take their toll. How long your tint lasts depends on the type of film you choose, the quality of the installation, and how you care for it. In this article, we’ll break down what really affects a tint’s lifespan, how long each type of film holds up, and the signs that it’s time for a replacement.
The lifespan of window tints comes down to a few simple things, and not all tints are made to last the same.
If you choose the right film and take care of it, window tints can look great and do their job for many years. It’s worth getting the best option up front so you don’t have to replace it sooner than expected.

Not all window tints age the same, so choosing the right one makes a big difference.
If your car spends all day in the sun, even high-quality tints won’t last forever. But with ceramic film and a professional installation, you’ll get a decade or more of protection and great looks.
Window tints don’t just quit on you all at once—they give you hints that it’s time for a replacement. Here’s what you’ll notice:
If any of this sounds familiar, it’s time for an upgrade. Damaged tint isn’t just an eyesore—it stops doing its job, and that’s a problem.
Keeping your window tints in good shape doesn’t take much, but it makes a big difference. First off, start with a high-quality film like ceramic or metalized options—they handle heat and UV rays much better than the cheap stuff. Then, get it installed by professionals who know what they’re doing. A good install means no bubbles, no peeling, and a tint that stays put for years.
Once your tint’s on, treat it right. Use soft microfiber cloths and mild, ammonia-free cleaners when you’re wiping down the windows. Harsh chemicals or rough rags can scratch the film and wear it out faster. And if you can, park in the shade or in a garage. Less sun means less fading, so your tint keeps looking sharp.
With just a little care, your tints will look good, block heat, and last way longer than you’d expect.
At D&A Customs, we know window tinting isn’t just about darkening your windows—it’s about quality, durability, and getting it right the first time. That’s why we use premium-grade films that don’t fade, bubble, or peel after a summer in the sun. Whether you’re dealing with scorching heat or harsh winters, our tints hold up and keep doing their job year after year.
Installation is where a lot of shops cut corners, but not us. Our team knows the tricks to avoid common issues like air bubbles, wrinkled edges, or peeling corners. We take our time because we know you’ll be looking at those windows every day, and we want them to look flawless.
We also don’t believe in one-size-fits-all solutions. Maybe you need a ceramic film that blocks heat for long drives, or maybe you just want something budget-friendly that looks clean and professional. Either way, we’ll walk you through the options and help you pick what’s right for you.
Our goal is simple: give you tints that look sharp, hold up over time, and make you glad you chose D&A Customs.
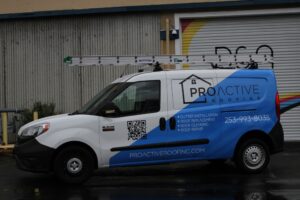
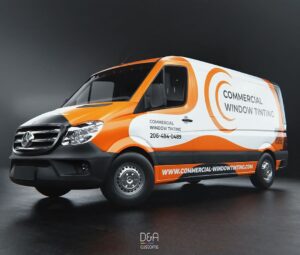
Turning your car into a moving ad might sound like a big step, but it’s one of the easiest ways to get your business noticed. Think about it—wherever your car goes, your brand follows. Whether you’re stuck in traffic or parked on a busy street, your vehicle can grab attention and stick in people’s minds. At D&A Customs, we know how to take your ride and make it work for your business. Let us show you how to turn your car into a rolling billboard that’s both eye-catching and professional.
Vehicle wraps are more than just eye-catching—they’re one of the smartest ways to advertise. Here’s why:
Unlike stationary billboards or fleeting online ads, a vehicle wrap moves with you, delivering your message wherever you go. It’s one of the easiest ways to make sure your brand is always on display. Besides, with numbers like these, it’s clear that vehicle wraps don’t just get your business noticed—they make a lasting impact.
Turning your vehicle into a rolling ad isn’t just about making it look good—it’s about making sure it works for your brand. At D&A Customs, we handle everything to give you a wrap that’s not only eye-catching but also built to last.
With these steps, we make sure your vehicle grabs attention and represents your business wherever it goes.
Vehicle wraps aren’t just for big companies—they work for anyone who wants their brand to get noticed. Here’s how they help:
No matter what you do, a great wrap makes every drive or stop a chance to show off your brand.
There’s no shortage of companies offering vehicle wraps, but at D&A Customs, we make the process different—and better. It’s not just about putting vinyl on a car; it’s about making sure your brand gets noticed and remembered.
We take the time to understand what you’re looking for and how to make it work for your business. Every design is custom, every material is top-quality, and every install is done with care. It’s about more than looks—it’s about making sure your vehicle works as hard for your business as you do.
If you want a wrap that stands out and lasts, we’re the team to call.
Picture a storefront with bold, eye-catching designs that immediately tell you what the business offers. Window graphics achieve this by combining visual appeal with purpose. These graphics aren’t just for decoration—they help businesses attract customers, build brand identity, and add privacy where needed. This article will take you through each step of the process, from turning ideas into designs to applying the final product, while answering key questions along the way.
Think about the last time a storefront caught your eye. Chances are, it had bold, creative graphics that told you something about the business before you even walked in. Window graphics do exactly that—they act as your silent salesperson, drawing people in and communicating your message without saying a word.
Key reasons why businesses invest in window graphics include:
At D&A Customs, we work closely with businesses to bring their ideas to life. Whether it’s turning a café window into a piece of art or giving a retail space a sleek, professional look, we make sure every project is both functional and striking.
Every great window graphic starts with a simple idea: what do you want people to see and feel when they look at your windows? This is where the magic begins. The design needs to match your business’s personality and speak directly to your customers.
Here’s what makes a solid concept:
At D&A Customs, we make this step easy by working closely with you. For example, a local bakery might want a cheerful design to highlight fresh pastries, while a gym might ask for something clean and motivational. It’s all about turning your ideas into something that stands out and feels just right for your space.
Picking the right material for your window graphics can make all the difference. It’s not just about how it looks—it’s about how it works for your space and how long it lasts. Whether you need something that grabs attention or adds a bit of privacy, the material has to fit your needs.
Here’s a quick breakdown of popular options:
When helping clients at D&A Customs, we always ask about their goals first. For example, if you need something temporary for a big sale, clear decals are the way to go. But if you’re updating your office for a more professional look, frosted films might be the better pick. It’s all about making sure the material works for your space and stands up for everyday use.
This is where your design turns into something real. High-quality printing makes sure your window graphics look as planned—sharp, vibrant, and ready to make an impact. The details matter here, from the colors to the durability of the final product.
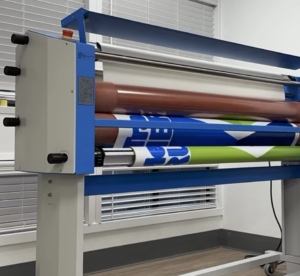
During printing, high-resolution machines recreate every detail of your design with stunning accuracy. Then, laminates or UV coatings keep the graphics from fading or getting scratched, especially important for outdoor installations. Every graphic is inspected to make sure the colors are accurate, the edges are clean, and the print looks perfect.
For example, graphics with UV protection can last up to five years on exterior windows, even in harsh sunlight. Businesses often choose laminated finishes because they help the design stand up to daily wear, like cleaning or weather changes. This step makes sure your graphics don’t just look good on day one—they keep looking great for years.
This is the moment everything comes together. A smooth installation is what takes your window graphics from a great idea to a flawless reality. The process isn’t just about sticking the graphic on—it’s about making sure it looks professional and stays put for as long as you need it.
How installation works:
For big projects, like large storefront windows or complex designs, professional installation is worth it. We know how to avoid common problems, like misaligned graphics or bubbles trapped underneath. This attention to detail keeps your graphics looking clean and professional for years.

Window graphics can completely change how people see your business—literally. A well-designed and properly installed graphic not only grabs attention but also delivers a lasting impression. Whether it’s a storefront that turns heads or a sleek, frosted film for your office, the key is making sure every step, from design to installation, is done with care.
At D&A Customs, we’ve worked with businesses of all types, from small local shops to larger corporate spaces. We’ve seen firsthand how the right graphics can boost foot traffic, enhance branding, and even create a more professional environment. Our team is here to guide you through every part of the process, ensuring your window graphics look great and stand the test of time.
If you’re ready to bring your windows to life, D&A Customs has the tools, expertise, and creativity to make it happen. Let us know your vision, and we’ll help you turn it into a reality.
Vehicle wraps are more than just a layer of vinyl—they’re a statement, a form of advertising, and a protective shield for your vehicle’s original paint. However, to achieve the impact that a well-designed wrap promises, professional installation is key. At D&A Customs, we’ve seen how a great design can be wasted by poor installation, leading to bubbles, peeling, and mismatched seams.
Without experienced hands and the right techniques, even the best wrap can end up looking less impressive than it should. In this article, we’ll explain why choosing professional installers like our team at D&A Customs makes all the difference in creating a wrap that not only looks stunning but stands the test of time.
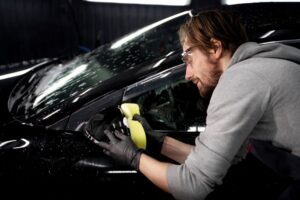
Getting a vehicle wrap installed isn’t as simple as putting on some vinyl—it takes real skill to make it look good. A professional installer brings not only experience but also a deep understanding of how vinyl reacts, how different weather conditions affect the outcome, and how to adapt to the unique shape of each vehicle. DIY attempts or inexperienced installers often lead to bubbles, peeling edges, or poorly aligned graphics. A study found that about 50% of DIY wraps show visible flaws within a year, while professionally installed wraps tend to stay flawless for much longer.
Why hiring an expert makes a difference:
The difference between a wrap that turns heads and one that looks sloppy usually comes down to having the right expertise.
Professionals rely on more than just experience—they have access to the right tools and know exactly how to use them to get a perfect finish. These tools aren’t the kind you’d typically find at home. Heat guns, precision cutting knives, and specialized squeegees are game-changers in vehicle wraps. Heat guns help mold vinyl smoothly around curves and edges, precision knives make sure every cut is spot-on, and specialized squeegees eliminate air bubbles while protecting the vinyl.
Now, let’s compare these professional tools to what you might use if you tried a DIY wrap.
Without the right tools and the skill to use them, wraps can end up with bubbles, uneven edges, and a generally sloppy look. Pros make a wrap look like it’s meant to be there—not like a rushed afterthought.
A vehicle wrap should not only look good right away—it should stay that way for years. If the wrap isn’t put on right, problems start showing up fast. The edges may lift, corners may peel, and dirt can get under the vinyl. This makes the wrap look bad and shortens its life.
Professionals know how to avoid these issues. They start by cleaning the car thoroughly. There can’t be any wax or dirt left behind, or the wrap won’t stick well. After that, they make sure to line up the wrap exactly right. A small mistake means uneven spots that can peel later. When they press down the wrap, they know how much force to use to make it stick for good so nothing gets under it. These careful steps help the wrap stay put for a long time.
A study shows that wraps done by professionals can last up to 7 years. Badly installed wraps often look worn out in just a year.
Why professional installation makes wraps last longer:
A wrap is more than just a look. It’s a way to protect the vehicle. When professionals do it right, the wrap stays strong and keeps the car looking great for years.

When it comes to vehicle wraps, the final look matters just as much as the quality of the vinyl. A wrap put on by a professional always stands out for all the right reasons. It doesn’t have crooked lines, bubbles, or corners that look like they’re about to peel. Instead, it fits perfectly—like it’s always been part of the car.
Professionals pay attention to every small detail. When it’s time to fit the vinyl around tricky spots like door handles or mirrors, they don’t just make random cuts. They make sure every cut is precise so nothing looks out of place. The result? Everything lines up right, the graphics look balanced, and the design flows smoothly over the car.
On the other hand, a DIY job or an inexperienced installer might leave uneven edges or graphics that just don’t line up right. You can often see bubbles trapped under the surface, and the wrap looks like it’s just sitting on top rather than being part of the car.
A great design deserves the right installation to bring it to life. When a pro handles the job, the wrap looks like it belongs. It becomes a part of the vehicle, making it look unique and complete as if it came that way right from the factory.
Getting a vehicle wrap is more than just changing how your car looks—it’s about making sure that the new look stays sharp for years. When you choose professional installation, like the kind we offer at D&A Customs, you’re not only getting a cool design but also a wrap that sticks well, stays bubble-free, and fits perfectly.
Instead of risking it with a DIY attempt or going with someone less experienced, trust the experts. D&A Customs will ensure your wrap looks great from the start and keeps looking good. When you want a wrap that stands out and lasts, the best choice is to call in the professionals.
Getting the right window tint for each office space can make a big difference in comfort, privacy, and even energy bills. Tinted windows aren’t just for looks—they help create the right atmosphere in different parts of the office, from keeping meetings private to making lobbies feel bright and welcoming. Conference rooms, lobbies, and private offices all need a different approach when it comes to tint levels. This guide covers what to keep in mind and offers tips for picking the best tint for each space.
Different parts of an office call for different types of window tint. Picking the right tint level can make a huge difference in privacy, cut down on that annoying glare, and even help lower the office energy bill. Here are a few key points to think about:
Let’s talk more, but if you don’t want to learn all this—D&A Customs can help figure out the best tint level for each area so that every part of the office works as it should.

Conference rooms need privacy and focus, and it turns out that around 90% of people feel more at ease sharing information when they know they aren’t being watched. That makes privacy a big deal in these spaces. A higher tint level keeps meetings confidential and cuts out outside distractions so employees and clients feel comfortable talking openly.
For these rooms, options like a frosted tint or mirrored tint work well. Frosted tint adds a modern touch without feeling too closed off, while mirrored tint has a sleek look that stops people from seeing in.
The lobby shapes a visitor’s first impression, so it needs to feel bright and open. But with all that sunlight, lobbies can easily heat up. Studies show that UV-blocking window tints can reduce heat by up to 78%, which helps keep the lobby cool and can save on energy costs.
For these spaces, a lighter tint usually works best. It keeps the natural light flowing in, creating a welcoming atmosphere while filtering out harmful UV rays that can fade furniture and flooring. Light reflective tints or subtle gray shades strike a good balance between style and function, making the lobby feel open while protecting it from the sun’s effects.
Private offices need the right mix of privacy and daylight. People want enough sunlight to stay energized but also need a little privacy to focus or have private conversations. Research shows that natural light can increase productivity by around 15%, so the right tint can really improve how people feel and work.
A medium tint usually hits the sweet spot for private offices. It keeps things more private without letting out too much light, so the room feels open and comfortable. Neutral or light gray tints are popular choices—they give just the right amount of coverage, letting in enough natural light while still keeping the space feeling calm and focused.
The right tint can make the office feel more comfortable, private, and even help reduce energy costs. With options to fit each area’s unique needs, window tinting improves the workspace for everyone who walks through the door.
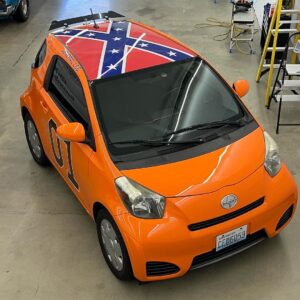
Roof wrapping is like giving your car a stylish, protective hat. Think of it as an easy way to shield the paint from sun damage, dirt, and those annoying little scratches that seem to appear out of nowhere. Instead of investing in a pricey paint job, a roof wrap lets you add a fresh look while preserving the original paint underneath. Plus, if you ever want to switch up the style or go back to the original look, removing the wrap is simple and leaves no damage. It’s an affordable, flexible option for keeping your car looking sharp without the hassle.
Roof wrapping is like adding a protective shield to your car’s roof. It’s made from tough vinyl that stands up to the elements, which means your car’s paint gets a break from all the things that could damage it over time. Here’s what a quality wrap can do:
With these benefits, roof wrapping offers a practical way to protect your car while adding a unique touch.
Roof wrapping isn’t just about keeping your paint safe; it’s a way to give your car some personality while saving money. Here’s why so many car owners are going for wraps:
So, besides protecting the paint, roof wraps let you upgrade your car’s look whenever you want and keep it in excellent shape.

At D&A Customs, we make sure your roof wrap looks great and stays in place. Wrapping isn’t just about putting vinyl on your car’s roof—it’s a careful process to get a clean, professional finish.
At D&A Customs, we focus on the details to make sure your car’s wrap looks fresh and lasts a long time.
Keeping your roof wrap looking sharp doesn’t take much. At D&A Customs, we always share simple tips with our clients after a wrap so you know exactly how to take care of it. Start by washing it gently with a soft sponge and mild soap—no need for rough scrubbing that might lift the edges. Stick to mild cleaners since harsh chemicals can mess with the vinyl. Power washers? Best to skip them. Hand washing is safer and keeps everything in place. And when you can, park in the shade or in a garage. Sunlight can wear down the color over time, so a bit of shade helps it stay fresh longer.
If you’re looking for an easy way to keep your car’s paint looking fresh, roof wrapping could be the perfect pick. It protects your car from sun damage, scratches, and bad weather, plus it lets you add a unique style that’s all yours. With tons of colors and finishes to choose from, you can find a look you like—and if you ever want a change, just peel it off and go for something new.
At D&A Customs, we’ve got you covered with vehicle wraps that are both protective and stylish. Our team is here to help you find the right wrap and answer any questions you’ve got.
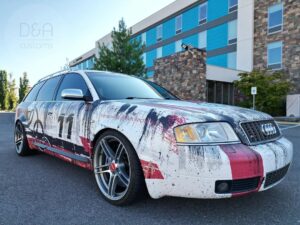
Sometimes, you just want your car to stand out without paying for a full paint job. That’s where car wraps come in. They let you change the look of your car, protect its original paint, and even help with resale value. At D&A Customs, we’ve seen all kinds of styles and ideas, from simple color changes to bold custom designs. But what exactly is a car wrap, and why are more people choosing them? Let’s talk about it.
A car wrap is like a second skin for your car. It’s a thin layer of vinyl that sticks to the car’s paint and changes how it looks without making a permanent change. You can choose from a wide range of colors and finishes, whether you’re into a sleek matte black, a shiny gloss, or something more unique like a metallic finish. Wraps offer tons of options, whether you want a simple color change or something bold.
Types of car wraps include:
Full wraps are perfect if you want a completely new look for your car. Partial wraps, on the other hand, let you add a personal touch to specific areas without going all-in. According to a survey from a leading vinyl manufacturer, around 60% of drivers prefer full wraps to achieve a fresh, polished style, while many businesses invest in custom wraps to boost brand visibility.
Car wraps do more than just change how your car looks. They offer a lot of practical benefits that make them a popular choice for drivers.
Key benefits include:
Wraps offer flexibility that paint jobs can’t. A study by Avery Dennison, a leading vinyl manufacturer, found that car wraps can protect the paint and even help keep up to 70% of the car’s value if removed correctly. That’s a big deal if you plan to sell your car someday.
The lifespan of a car wrap depends on a few key factors. On average, a good wrap can last between 5 to 7 years if it’s done right. High-quality wraps usually come with warranties, showing that they’re built to last when properly looked after.
3 main factors affecting the lifespan of a car wrap include:
According to 3M, a leading vinyl maker, car wraps installed by professionals can last up to 7 years with the right care. So, if you want cool vehicle wraps that stand out and stay sharp, it’s worth choosing quality materials and a skilled installer like D&A Customs.
When you’re getting a car wrap, picking the right shop can make all the difference. At D&A Customs, we don’t just wrap cars—we help people show off their style with wraps that look amazing and last. Here’s why so many car owners choose us:
At D&A Customs, we care about more than just the look. We want to protect your car’s paint and help you get the most out of your wrap. With our team’s experience and attention to detail, you’ll drive away with a wrap that you’re proud of.
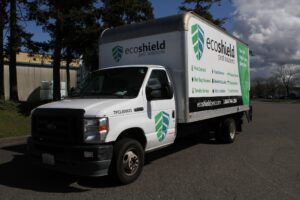
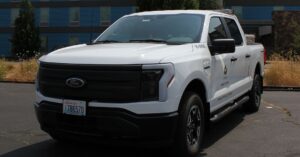
Truck wraps are an awesome way to make your vehicle stand out and get noticed on the road. But let’s be real, the first thing you’re probably wondering is, “How much is this going to cost me?” The truth is, there’s no one-size-fits-all answer—it depends on a few things like the size of your truck and how fancy you want the design. At D&A Customs, we’ve wrapped everything from small pickups to massive rigs, so in this article, we’ll break down the numbers and help you figure out what to expect when pricing a truck wrap.
When you’re thinking about getting your truck wrapped, there are a few key things that can impact how much you’ll end up paying. It’s not just as simple as picking a design and hitting the road. Factors like the size of your truck, the type of wrap, and even the quality of materials all play a part in determining the cost. Let’s talk more.
These factors show how costs can fluctuate based on choices. And remember, while it’s tempting to go for the cheaper option, spending a little more on higher-quality materials can save you money in the long run. So, now that you know what influences the price, let’s take a closer look at how the numbers stack up.
Let’s get into the numbers. The cost of wrapping a truck depends on the things we talked about earlier, but here’s a simple guide to help:
These numbers should give you a good idea of what to expect. But since every truck is different, it’s always best to get a custom quote. You can call D&A Customs to get an exact price for your specific truck and design needs. Prices can also change depending on where you live and who’s doing the work, so getting a personal estimate will help you plan better.
It might seem like a good idea to save money and try wrapping your truck yourself but trust me, having it done by professionals is a much smarter move. When you let the pros handle it, you get a clean, smooth finish that lasts. On the other hand, a DIY job can lead to air bubbles, peeling edges, or even damage to your truck’s paint. Fixing those mistakes later can end up costing you way more than hiring a professional in the first place.
At D&A Customs, we’ve seen it all and know exactly how to apply a wrap the right way. Whether it’s a small truck or a big rig, our team knows how to make sure everything looks perfect and stays put. That means you won’t be dealing with any annoying fixes down the road.
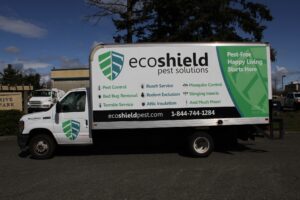
Getting a good truck wrap isn’t just about making your truck look cool. It also protects the paint and adds value. The wrap works like a shield, keeping the original paint in great shape. This helps if you ever want to sell the truck because the paint will still look brand new.
A high-quality wrap can last 5 to 7 years. That means you get years of free advertising for your business, and your truck stays protected during that time.
Now that you understand what affects the cost of a truck wrap, you can make a better decision. If you’re looking for a full wrap or just want part of your truck covered, it helps to know what you’re paying for. And remember, it’s not just about the cost—it’s about getting something that looks great and lasts.
If you want to know the price for your truck, D&A Customs can give you an exact number. Just call us, and we’ll explain your options, go over the design, and give you a price that works for you. Wrapping your truck isn’t just spending money—it’s a smart way to protect your truck and show off your brand.


